> For the complete documentation index, see [llms.txt](https://help.fastwork.vn/fastwork-help-center/llms.txt). Markdown versions of documentation pages are available by appending `.md` to page URLs; this page is available as [Markdown](https://help.fastwork.vn/fastwork-help-center/huong-dan-s-dung-chi-tiet/fastwork-work/fastwork-checkflow/thao-tac-nguoi-dung/huong-dan-them-moi-mot-cong-viec-vao-trong-quy-trinh-cong-viec-checkflow.md).

# Hướng dẫn thêm mới một công việc vào trong quy trình công việc (checkflow)

Để thêm mới một công việc vào trong quy trình công việc FastWork hỗ trợ trên nền tảng Web và Mobile

## 1. Thao tác trên Web

**Bước 1:** Tại giao diện quy trình công việc (Checkflow) -> chọn **quy trình** muốn thêm công việc

<figure><img src="https://fc-use1-00-pics-bkt-00.s3.amazonaws.com/79620180ce66e27c66759c0d02a48a90ecc67a56e568b1d445f1e7ebd35a3fbc/f_faq-image/u_3e38da1de48fe4f2078620490fbd5d467f75d2fd226e5659079160450f082d15/img_1609401541665.png" alt=""><figcaption></figcaption></figure>

**Bước 2:**&#x20;

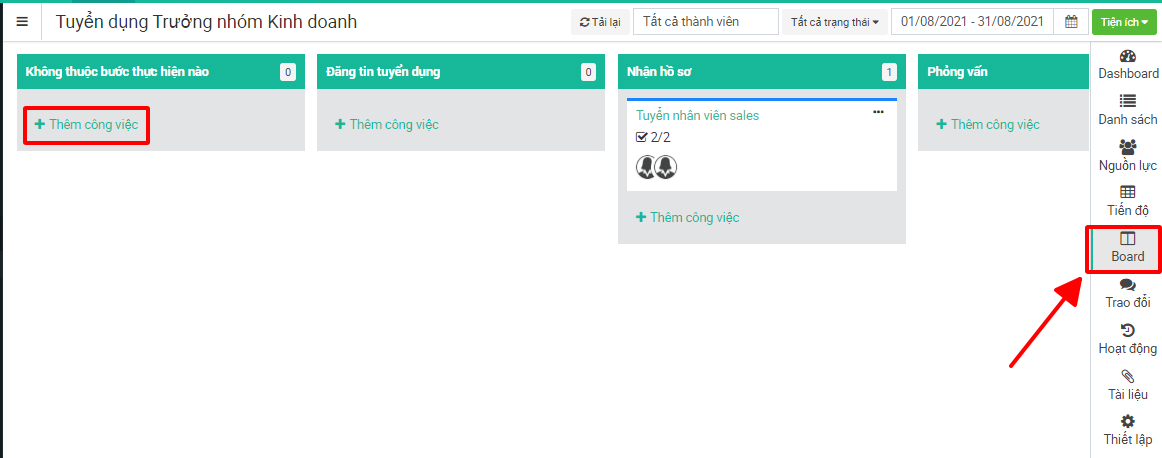
**Cách 1: Từ dạng bản Board (Kanban)**

* Bấm thêm công việc ở bảng **“Không thuộc bước thực hiện nào”**: Nếu như công việc chưa biết phân vào bước nào
* Bấm thêm công việc ở từng **Bước thực hiện:** Nếu như biết công việc đó đã thuộc bước nào.

<figure><img src="https://fc-use1-00-pics-bkt-00.s3.amazonaws.com/79620180ce66e27c66759c0d02a48a90ecc67a56e568b1d445f1e7ebd35a3fbc/f_faq-image/u_3e38da1de48fe4f2078620490fbd5d467f75d2fd226e5659079160450f082d15/img_o22f1po1lu_2c513540bd710b31eaa408ad0e1621e698699b4826f0699219d253d2b0ae9201.png" alt=""><figcaption></figcaption></figure>

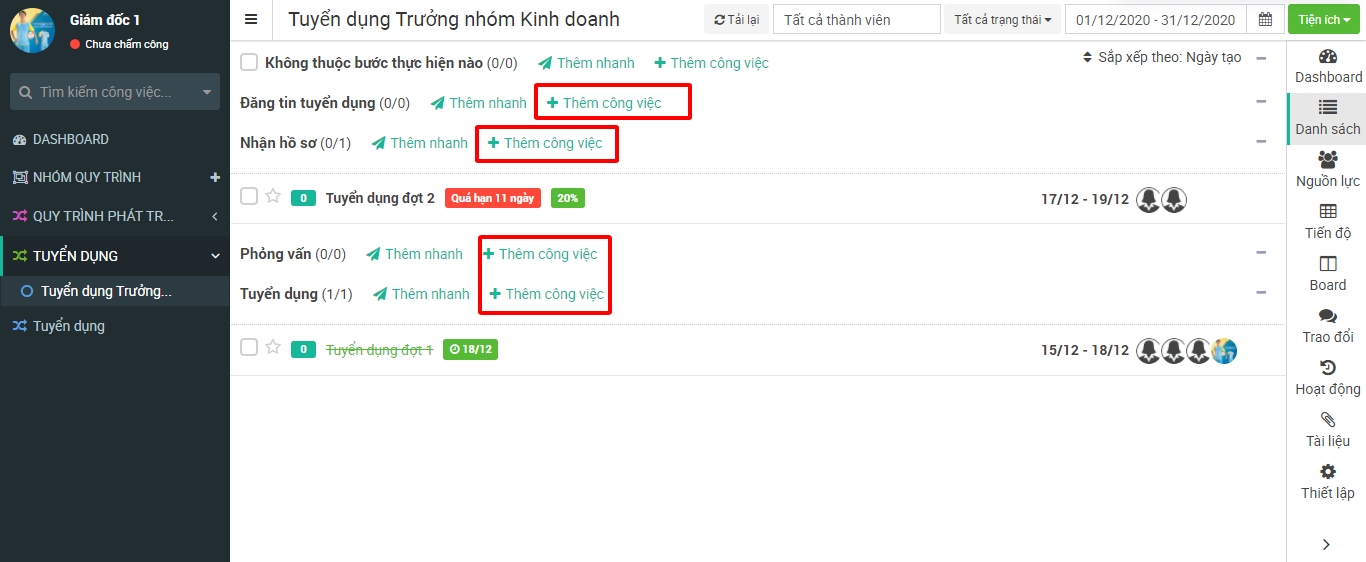
**Cách 2: Từ dạng danh sách**

* Ở mỗi Bước thực hiện -> chọn mục **Thêm công việc**

<figure><img src="https://fc-use1-00-pics-bkt-00.s3.amazonaws.com/79620180ce66e27c66759c0d02a48a90ecc67a56e568b1d445f1e7ebd35a3fbc/f_faq-image/u_3e38da1de48fe4f2078620490fbd5d467f75d2fd226e5659079160450f082d15/img_1609401647185.png" alt=""><figcaption></figcaption></figure>

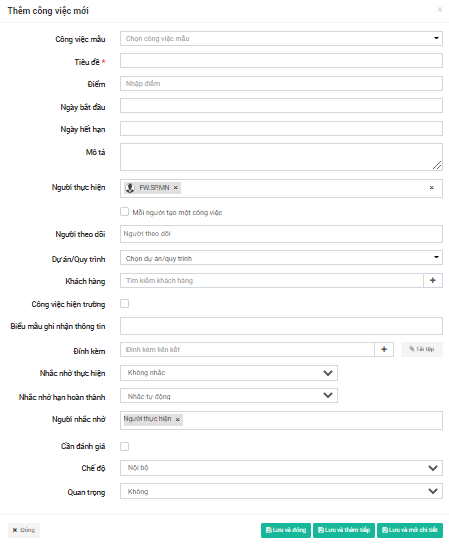
* Điền theo các trường thông tin có trong bảng hiển thị

<figure><img src="https://1934075284-files.gitbook.io/~/files/v0/b/gitbook-x-prod.appspot.com/o/spaces%2FSgjp5pKuJrPSuYtLZvBs%2Fuploads%2F1lgHdQr6pDEj9O7NquwT%2Fimage.png?alt=media&amp;token=63dda0e7-b7e7-49c7-9711-e789e71e1ea5" alt=""><figcaption><p>Giao diện thêm công việc mới</p></figcaption></figure>

* Sau khi điền xong có 3 cách **Lưu.**
  * ***Lưu và đóng:*** Lưu lại công việc và quay lại giao diện danh sách công việc
  * ***Lưu và thêm tiếp:*** Lưu lại công việc và mở ra giao diện thêm công việc mới để nhập thông tin&#x20;
  * ***Lưu và mở chi tiết:*** Lưu lại công việc và mở chi tiết thông tin công việc đã thêm mới

## 2. Thao tác trên Mobile

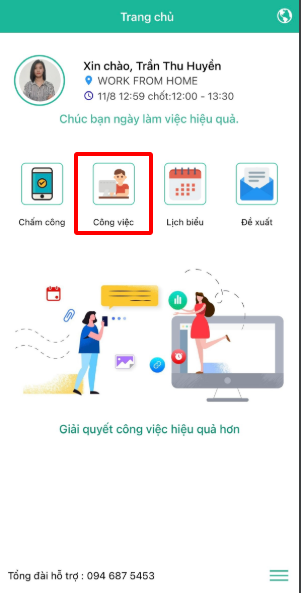
**Bước 1:** Từ giao diện mobile -> chọn **Công việc**

<figure><img src="https://fc-use1-00-pics-bkt-00.s3.amazonaws.com/79620180ce66e27c66759c0d02a48a90ecc67a56e568b1d445f1e7ebd35a3fbc/f_faq-image/u_3e38da1de48fe4f2078620490fbd5d467f75d2fd226e5659079160450f082d15/img_bqltkojr1t_90ae66ceffbb13338dd99e9757de3a22e3728427bc50f241b2ebcdf13d1bc9bc.png" alt=""><figcaption></figcaption></figure>

**Bước 2:**&#x20;

* Chọn nút **dấu “+”** để thêm công việc

<figure><img src="https://1934075284-files.gitbook.io/~/files/v0/b/gitbook-x-prod.appspot.com/o/spaces%2FSgjp5pKuJrPSuYtLZvBs%2Fuploads%2FCczPuHnymalEyabf4g6f%2Fimage.png?alt=media&amp;token=f28303a7-b6b0-4d5c-8116-d67ff91070f1" alt="" width="188"><figcaption></figcaption></figure>

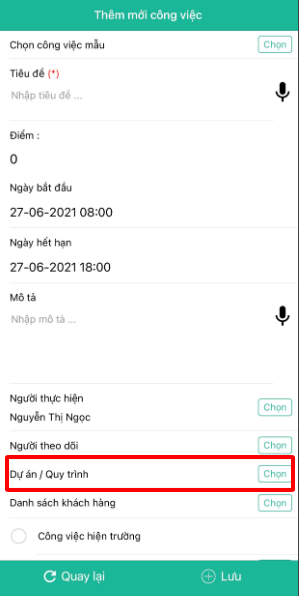
* Điền nội dung theo các trường thông tin
* Ở mục **Dự án/Quy trình** thực hiện chọn quy trình cần tạo công việc

<figure><img src="https://fc-use1-00-pics-bkt-00.s3.amazonaws.com/79620180ce66e27c66759c0d02a48a90ecc67a56e568b1d445f1e7ebd35a3fbc/f_faq-image/u_3e38da1de48fe4f2078620490fbd5d467f75d2fd226e5659079160450f082d15/img_hatiacfb2o_c054ba6a93f58056f27e52a968c6e08a0c555b484ae7cf4978b44a5711928d75.png" alt=""><figcaption></figcaption></figure>

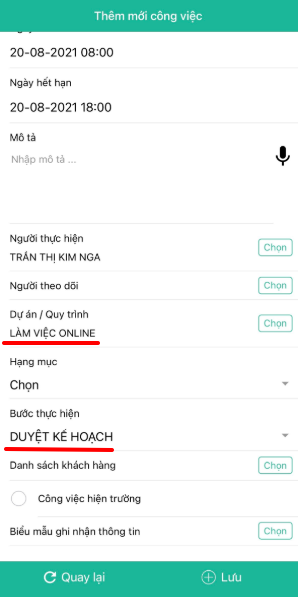
* Chọn quy trình làm việc ở bảng bên dưới hoặc có thể tìm kiếm ở trong ô tìm kiếm
* Chọn **Bước thực hiện** muốn đưa công việc vào

<figure><img src="https://fc-use1-00-pics-bkt-00.s3.amazonaws.com/79620180ce66e27c66759c0d02a48a90ecc67a56e568b1d445f1e7ebd35a3fbc/f_faq-image/u_3e38da1de48fe4f2078620490fbd5d467f75d2fd226e5659079160450f082d15/img_7an2sborne_a2557ae3aa1b17a84e34e8e62260bab39861a6d9d402aa2eecd45a4ad86d3305.png" alt=""><figcaption></figcaption></figure>

**Bước 3:** Sau khi hoàn thành -> Bấm **Lưu**